IBM Lotus Notes integration manual for the Sferyx JSyndrome HTML Editor Applet Edition
1. Can the Sferyx HTML Editor Applet Edition and the Sferyx Equation Editor be integrated into the IBM Lotus Notes - via Domino Designer and server to Web client and the Lotus Notes Thick client?Yes, the editor can be fully integrated and is working both via web and the Thick Lotus Notes client - it will work with all Notes versions since version 6 - from older to newer ones. The integration can be done directly within the Lotus Notes Domino Designer in a completely visual manner. The integration is immediate by following the simple steps described in the integration section below. 2. How can I integrate the editor into the IBM Lotus Notes system?The installation is very simple and does not require even a single line of code on your side and consists of simply installing the module. Follow the steps bellow: Open the Lotus Domino Designer and go to the Form Document or other item where you want to insert the applet. 1) Make sure that Java Applets are enabled - to do this do the following:
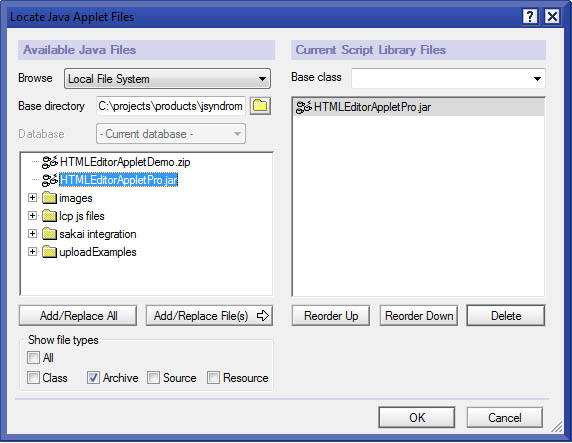
2) Import the HTML Editor Applet classes: When importing the applet you should
select import all files not only the classes. |
In Lotus Domino Designer go to "Create" menu
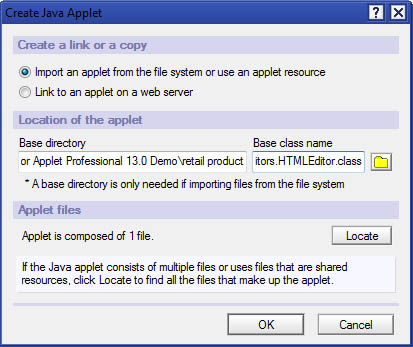
"Create" --> "Java Applet" --> Select the Base directory where the
applet is located --> Select the applet's JAR file through the
button "Locate" --> Put the class file name in the field
"Base class name" to sferyx.administration.editors.HTMLEditor.class --> When
selecting applet files select "All" checkbox and then
select and add the JAR file
If you look at the applet
properties in the Main menu --> Java Applet in the designer there should be
always DocBase and CodeBase like those:
DocBase: .../tytt.nsf/16527D3F4D57663085256663005C86A8
CodeBase: .../tytt.nsf/16527D3F4D57663085256663005C86A8/$FILE
where the codebase includes the entire file.
If you have done everything correctly you should see the applet running inside the Lotus Domino Designer. You can make sure the applets are allowed to run inside the Designer by going to the Main Menu --> View --> Show --> Java Applets running --> this checkbox should be selected.
The applet can be run in Lotus Domino Designer and Lotus Notes both in a
form or document items. To run the document with the applet from the
Lotus Domino Designer into the Lotus Notes Client go to the Main
Menu --> Design --> Preview in Notes or Preview in Browser.
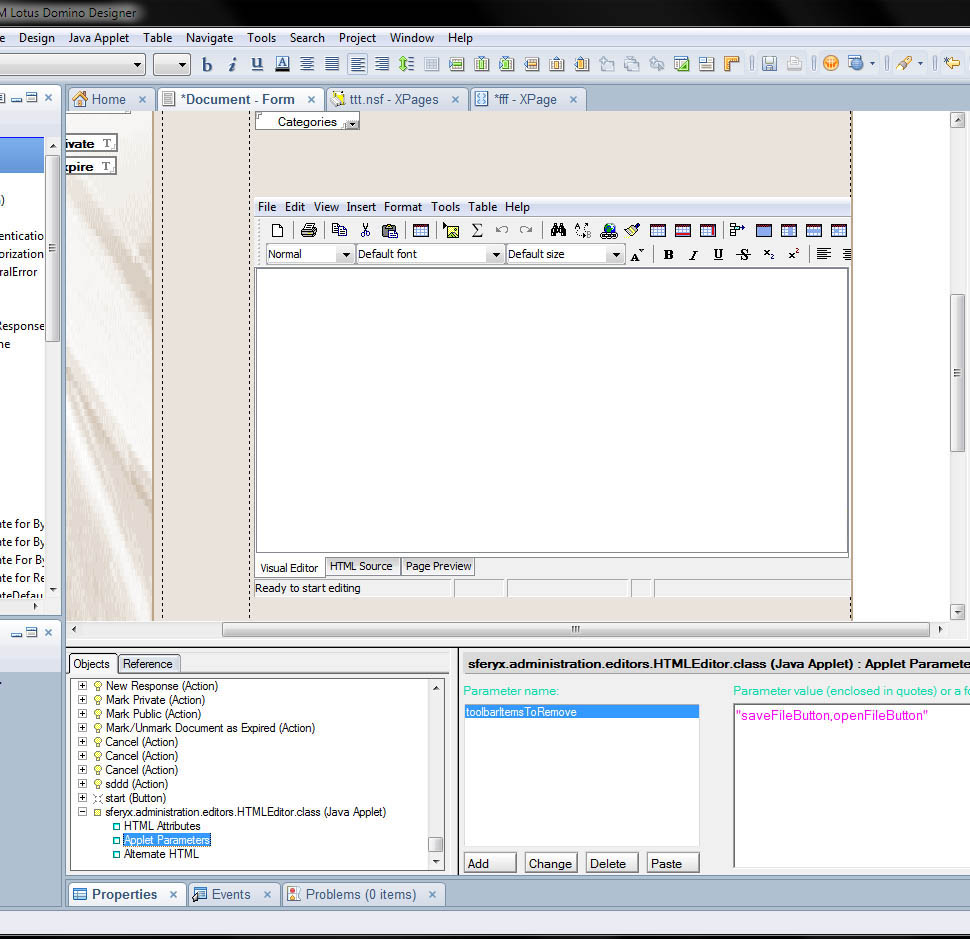
3) Set the applet parameters:
You can set all the HTML Editor Applet parameters as for any other Java applet used inside the IBM Lotus Domino Designer - simply follow the procedure below:
Go to the objects pane for the current document - there you will see in the objects tree also the entry for the HTMLEditor applet like the screenshot below. At this point you can select the applet and add the applet parameters you want - please note that the applet parameter values should be enclosed inside quotes "" otherwise they will not work. For the full list of available applet parameters please refer the User Manual and the FAQ.
3. How to configure the file uploads for the Sferyx JSyndrome HTML Editor Applet Edition within the IBM Lotus Notes Domino Client and Server?
You can enable the files uploads from the HTML Editor Applet to the Domino Server for example through the servlets API supported by the Domino Server. You can use any standard file upload servlet for to handle the applet uploads - please refer to the standard Domino documentation on how to enable, install and run servlets on the Lotus Domino server. Furthermore you can easily configure the necessary applet parameters directly from within the Lotus Domino Designer.
I. First approach for uploading images using Javascript methods:
To get the
upload working the easiest way is to do the following:
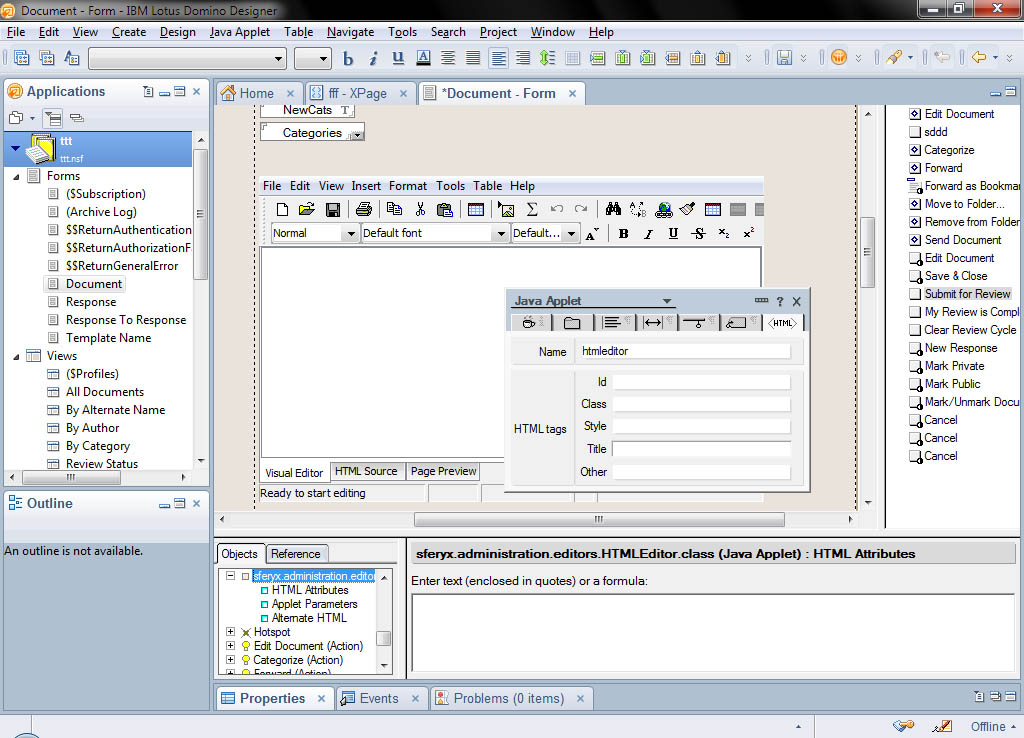
1) Select the applet and go to the applet properties - there on the
dialog you can find a tab called HTML - there you can specify the name
of the applet - you can put inside for example "htmleditor" as shown in
the screenshot below:
2) Now you can
create a button inside the document called "Upload" and on its onClick
handler you can put some javascript to tell the applet to upload
everything to the servlet.
You can use the following two methods:
public void setUploadedObjectsTranslationPath(String url) - will
set dynamically the translation path for resolving uploaded objects.
public boolean uploadMultipartContent(String saveLocation, boolean
entireFile) - this will upload the content of the editor to the
server as multipart form data - it will bundle together with the html
document all images, hyperlink targets etc. which are local object or
have a host different from this of the editor it self. The return value
is true if the upload is successful, false otherwise. You can make the
browser wait until the upload is completed waiting for the return value
for a variable from javascript. The saveLocation sould be the URL of the
server side script which receives the content of the editor, entireFile
indicates whether the content of the HTML document should be entire page
(including HTML, body etc.) or only a fragment of page -paragraph etc.
so your javascript will be like this:
document.applets.htmleditor.setUploadedObjectsTranslationPath("
http://your_server/images");
document.applets.htmleditor.uploadMultipartContent("
http://your_server/uploadSrvlet",true);
and the screenshot is like this:
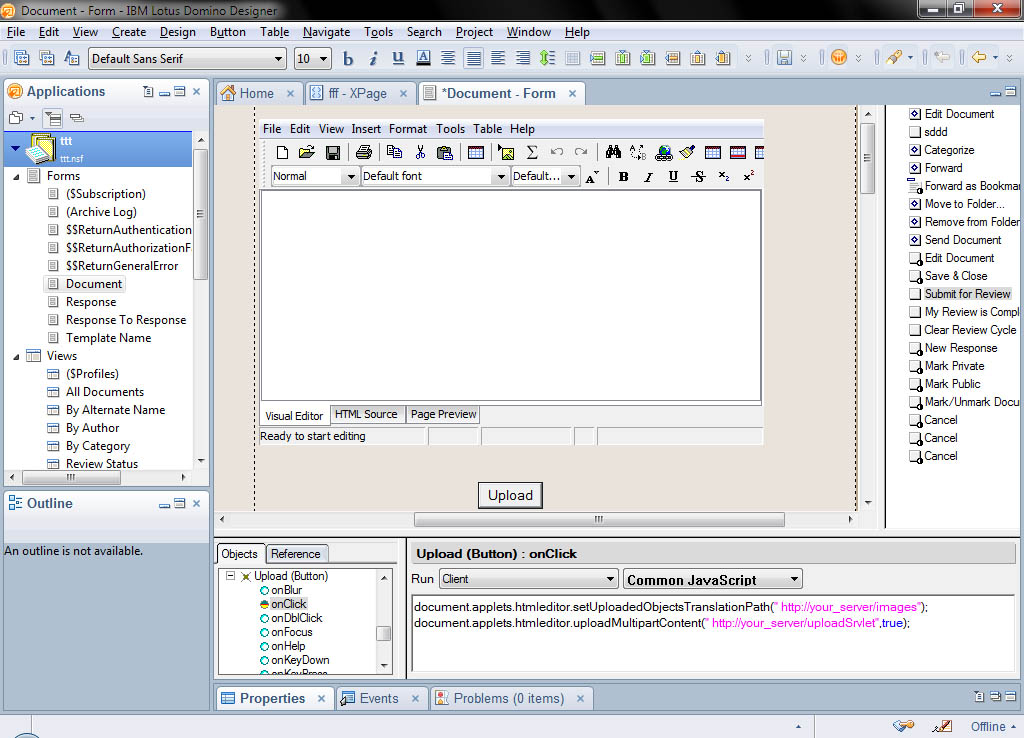
At this point if configured properly everything should work as expected - you can run it from "Preview in Notes" under the "Design" menu. When you press the "Upload" button it will publish the HTML content and all the images to the indicated server path.
II. Second approach for uploading images using applet parameters:
Alternatively, you can also embed all images inside the document as base64 encoded string which will produce self contained documents which are even easier to save to the database and there will no be any need of uploads. To do this you can simply use the following applet parater as explained in the section for setting applet parameters in Lotus Notes designer:
<PARAM NAME ="embedAllImagesInsideTheDocument" VALUE="true|false"> - will instruct the editor to automatically embed all images inside the document and create a self contained HTML document with inline Base 64 encoded images. This way it is very to transfer the whole document as a string and avoid uploading all images separately.
In order to be able to
upload files it is sufficient to configure the following applet
parameters as described in the tutorial - there is a section how to set
applet parameters in the Lotus Domino Designer. Here below are the
parameters to be used. If you set useSaveAsSaveRemote=true then
when you click on the "Save" icon on the toolbar of the editor all
images will be uploaded to the server otherwise you can use the "Save
remote" menu item on the "File" menu or the Javascript methods combined
with the applet parameters below.
uploadContentAsMultipartFormData VALUE="true" - this will force
the editor to post Multipart content data to the server instead of
simple post data. It will include all images and hyperlink targets which
should be uploaded.
uploadedObjectsTranslationPath VALUE="http://server_path_to_the_uploaded_images"
- this is the translation path on the server which will be used to
transform the local paths in server-side paths. You should provide
values in according to your needs and the structure of your web
application.
variableName VALUE="htmlcontent" - indicates which variable to
be used for uploading the document content.
The URL of the script should be defined in the following parameter:
saveURL VALUE="http://server_path_to_the_upload_script"
- The saveURL parameter should be a fully qualified absolute URL
with http://.. etc.
Note that when posting the data to the server, the applet will not
change the page in your browser - it works exactly as when you save a
file to your local computer with the difference that it sends it
remotely. If there occurs an error, error message will be displayed,
otherwise on the status bar will appear " File saved successfully".
For advanced configuration
you may use the following additional parameters.
useSaveAsSaveRemote VALUE="true|false"
- this will cause all
buttons/menus for save to have the behavior of "Save Remote"
functionality. This way also the shortcut on the toolbar ("the save
floppy icon") can be used to save the content of the editor remotely.
The default is false.
saveEntireFile VALUE="true|false" - this parameter specifies
whether the "Save Remote" functionality should send entire HTML files
(including <html><head><body> tags) or should send only the body content
as a page fragment.
For the full list of available applet parameters and Javascript functions available to the Lotus Notes please refer the User Manual and the FAQ.
4. What advantages could bring the integration of the Sferyx HTMLEditor Applet, Equation Editor and PDFExport into the BM Lotus Notes Domino Client and Server?
In first place this way are delivered both advanced HTML and Equation editing capabilities for the entire system combined with instant PDF generation capability. Furthermore, the Sferyx HTMLEditor is capable of publishing many files simultaneously which is very useful when for example is pasted a Word document which contains many images and other external linked files. This way only by submitting the form everything is sent to the server and the entire document is published within seconds without the need the user uploads all files separately, renaming them and linking them back to the document. All this is done automatically by Sferyx, also it is capable of generating unique image filenames in order to avoid name collisions. This saves a lot of work both for the users and the developers and gets the work done within seconds and if you add to the whole this thing also the PDFExport it can generate on-the-fly PDF files from the documents and publish them together with the HTML to the server.
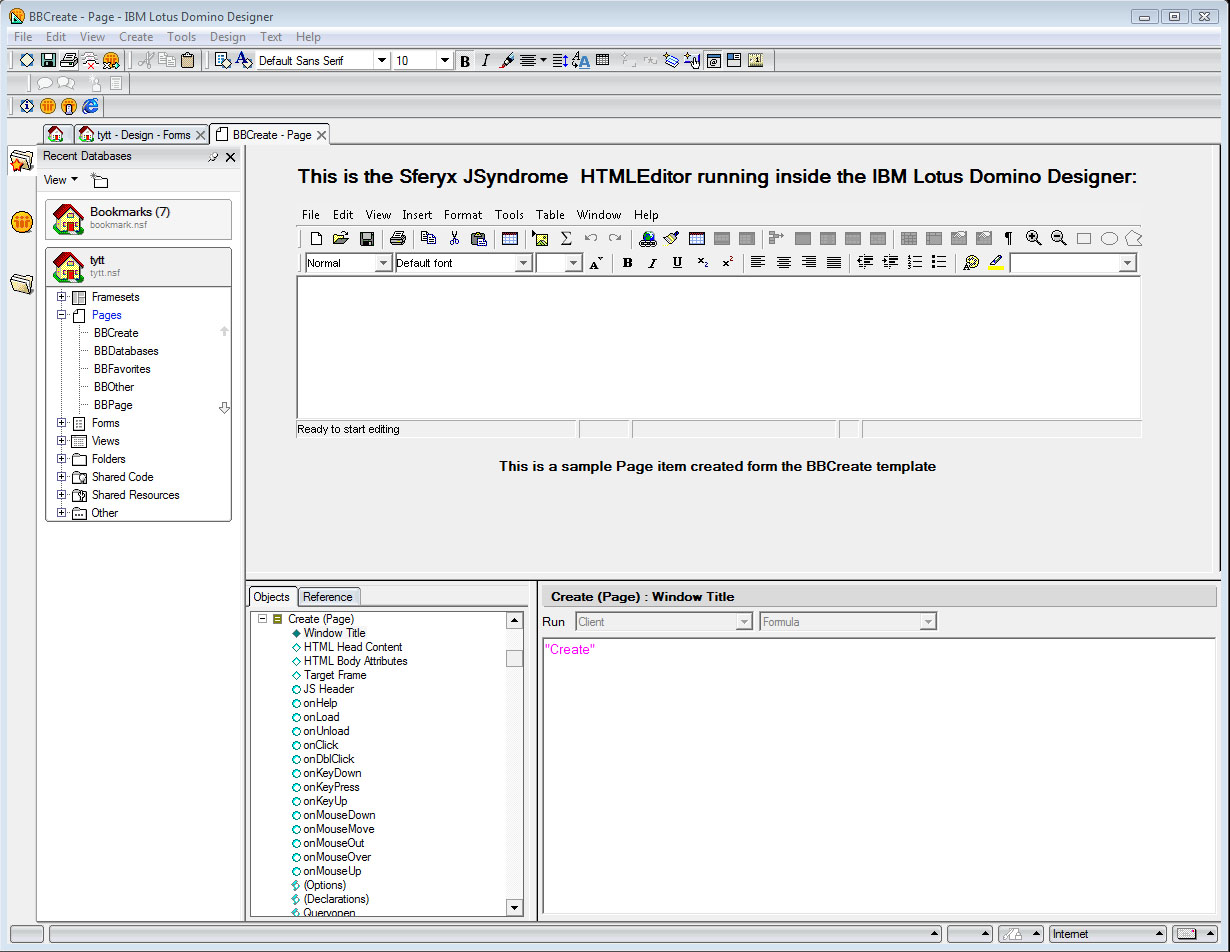
Sferyx HTML Editor Applet Edition running inside the IBM Lotus Notes Domino Designer:
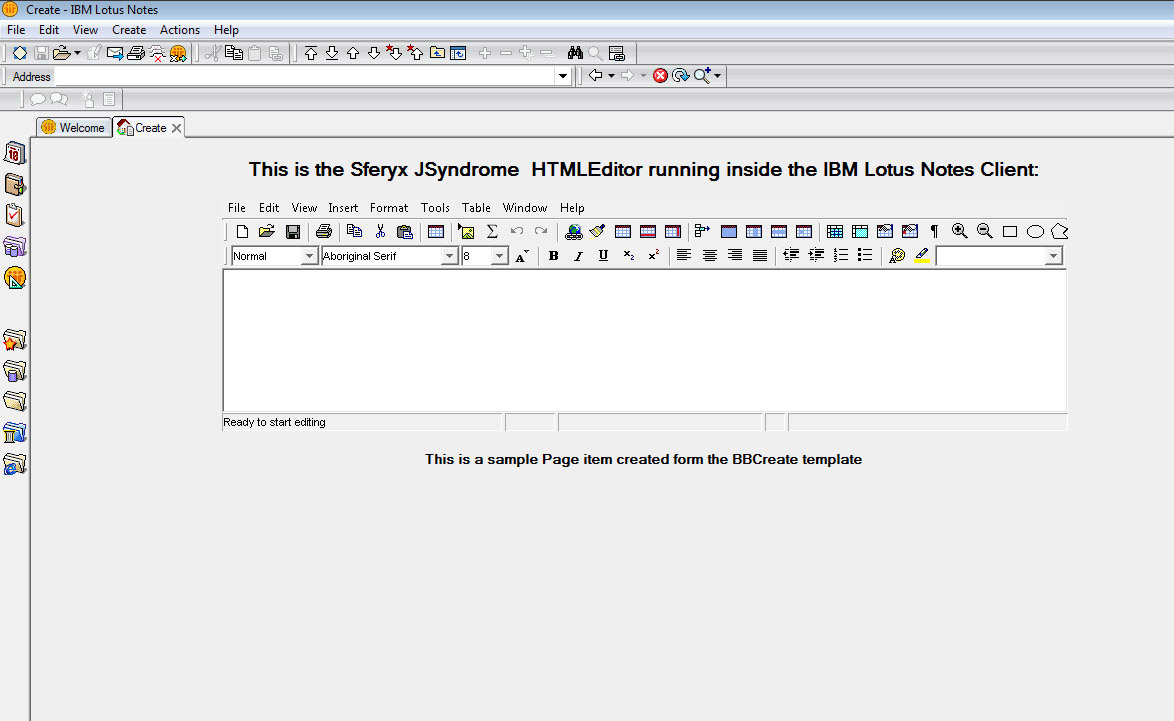
Sferyx HTML Editor Applet Edition running inside a IBM Lotus Notes Thick Client instance:
All Sferyx products are assured with continuous e-mail support. With the retail products is included in the price 30 days startup support. Additionally, you can purchase annual support subscription tickets from our web store.
Sferyx offers also a wide range of customization services for its products in order to satisfy any customer requirement. We can adapt our products to fit the customer needs and any kind of integration requirements. We execute also express developments, customization under request, development of new features on demand. You can request a quote at sales@sferyx.com or support@sferyx.com indicating your requirements and the terms of delivery.